Wednesday, June 5, 2013

5 Fresh Ideas to Add Low Cost, High Impact Looks to Your Bathroom

We (by we, I mean my husband) recently completed a master bathroom remodeling project. He removed everything except the toilet and set out to create the bathroom of my dreams in the same small space, and on a budget. We decided that we would splurge on just one component, a frame-less glass surround for the shower like we have seen in hotels. Beyond that, we were going to find stock items and keep costs as low as possible.

1. Tile
Tile selection today is incredible. We were both like kids in a candy store (or me in a shoe store) when we started out. After trying many samples in assorted colors and finishes, we decided to get the best quality porcelain tile we could afford in a neutral tone. Then we would add a contrast trim in something fancier. The fancy accent tiles can cost well upwards of $25 per square foot but we found this beautiful pebble tile for just $10 a square foot. Tile prices vary greatly. Once we knew what we were looking for, I shopped around in stores and online. Be sure to keep shipping costs in mind when buying online. Even with shipping costs, we saved a considerable amount of money buying from http://design-4-less.com/ and http://www.wayfair.com/Floor-and-Wall-Tile-l2970-c431627-O46375~Daltile.html
Order a sample if you are not sure, colors look very different in different lighting. It doesn't take much contrast tile to make a big design statement!

2. Double Sinks
Our original bathroom had one 4 foot long cabinet with a single sink set on a 7 foot wall. I have always wanted double sinks but 7' is not a standard cabinet size. Rather than the very expensive custom cabinets and sinks, we found these at Home Depot:
The set included the cabinet, sink top and mirror. So, we bought two and joined them with a shelf made from the shelf that was supplied for inside the cabinet. Now towels are stored between the two cabinets.
For the top shelf, we used the pebble tile and added some shells and sea glass for interest. Each cabinet/sink/mirror set was just $300, saving a considerable amount over custom.

3. Lighting

Traditionally, bar lights are featured for bathroom use. My husband, very talented in imagining lighting, opted for pendant lighting which adds a very fresh, finished feeling. I was concerned about the quality of light but it is, in fact, fabulous. We choose two basic fixtures for the sinks and a shell accents light to accentuate the center.

4. Mirrors

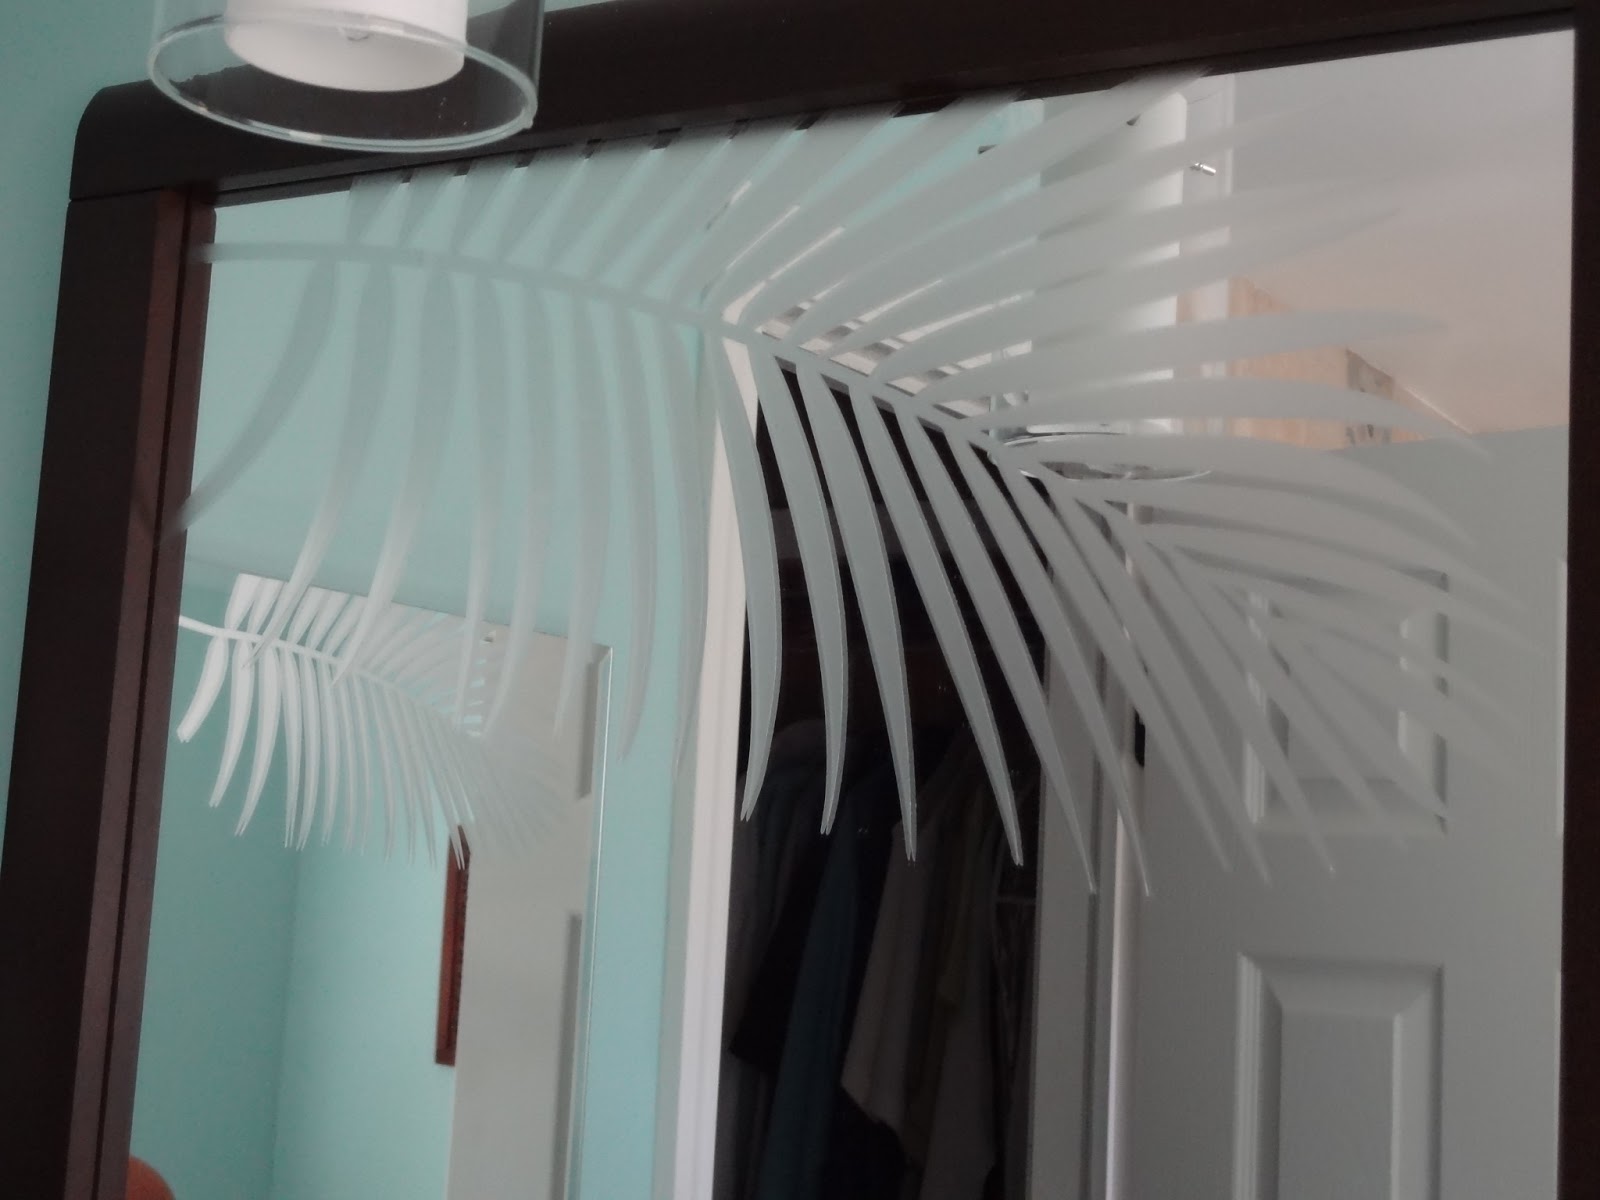
The mirrors were included with the cabinets so, of course, we wanted to use them. A bit plain, I added decals that I cut from etched-look vinyl to give the look of an expensive etched mirror without the expense or commitment. A simple palm leaf adds a breezy feeling to the room.

5. Whimsy


We like to incorporate our love of the beach, ocean and all things water. We added sand from a recent trip to Florida to these inexpensive frames and placed some of the shells we found.

By being creative and seeking out stock items, we save a ton of money but still finished with the bathroom of my dreams!


Tuesday, June 4, 2013

Review: Trader Joe's Gazpacho

Gazpacho, the delicious tomato-based soup served cold, is a definite taste of summer. I enjoy it very much in restaurants. I do not enjoy making it from scratch. I have tried but the results, pitiful at best, do not warrant the preparation. I was thrilled to see this last time I was in Trader Joe's.
I am a Trader Joe's groupie, I admit. I won't claim that everything in their brand is excellent, but 95% of the time it is. I did not hesitate to grab two cartons of gazpacho, priced at $2.99 each. The gal at the register raved about it and noted it's only available in summer. I decided it would be my dinner.
I didn't bother with a bowl, I just opened the container. I did swirl in a tablespoon of low fat sour cream as that is how it is generally served in restaurants. 
It was delicious! A bit of crunch from the cucumbers, peppers and onions. Slightly spicy. Very fresh-tasting. No food processor required!!! A serving size is 1 cup, 2 servings per container. I ate the entire thing but at just 45 calories and no fat per serving, it was a great food deal. 
I'm not sure how long Trader Joe's will be carrying this gazpacho but I will be grabbing a couple containers each time I go in!

My review: Excellent and a great buy

The EASIEST White Sangria: Refreshing and Delicious


White Wine Sangria

A few years ago, I was determined to serve both a red and a white wine sangria at a large party I was hosting. I thought that finding a recipe would be easy. I ended up trying so many variations, I was hung-over for a month. My mistake was getting too complicated.
This sangria may not be considered authentic but it is easy, delicious, and a crowd-pleaser.

Pour 3 cups white wine (I chose this Pinot Grigio from Trader Joe's for $3.99) in a glass pitcher
Add an assortment of sliced and chopped fruit. I used strawberries, oranges, lemons, limes and pineapple
Muddle the fruit for a few minutes and refrigerate, even overnight, so the fruit flavors blend with the wine
Just before serving, add 3 cups of  7Up or Sprite (I chose Sprite Zero to cut the calories)
Add a slice of fruit to each glass

As long as the wine and Sprite are in equal measure, you can easily make as little or much of this as you like. For my guests, we needed more!

Recipe: Chicken Tortilla Soup starring Pressure Cooker Rotisserie Chicken Stock

Chicken Tortilla Soup starring Pressure Cooker Rotisserie Chicken Stock
This is a much lighter version than the cheesy, restaurant soups but very flavorful and satisfying.

8-12 cups of Rotisserie Chicken Stock
1 onion, chopped
1 T. olive oil
4 tsp. chopped garlic (or a tsp. of garlic powder)
2 tsp. cumin
1/2 tsp. red pepper
1 can black beans, rinsed and drained
3 large tomatoes, chopped or a 14 oz. can of tomatoes
1-2 cups of fresh or frozen corn
1-2 avocados, diced
fresh cilantro, chopped
lime
sour cream, optional
tortilla strips

Saute the onion in the olive oil with the garlic. Add the cumin and red pepper.
Add the chicken stock with cooked chicken (or 8 cups of chicken broth with 2 cups of cooked, diced chicken)
Add the black beans, tomato and corn and heat through.
Place the diced avocado in your bowl, ladle in the soup and top with chopped cilantro and tortilla strips. Give a squeeze of lime and stir in sour cream if desired.

This is a much lighter version than the cheesy, restaurant soups but very flavorful and satisfying.

Review: Women's Nike Summer Lite Golf Shoes


I haven't purchased new golf shoes in more than 10 years, partly because I find the selection of golf shoes for women to be hideous. I don't know who designs for women golfers but, yuck. I really needed a new pair and was thrilled when I found the Nike Summer Lite Golf Shoes. Yes, I was initially attracted to the color. But there is substance behind this style.

I could not find this style in my size in my local stores so I took a chance and ordered online. I chose an EBay shop called Player's Choice Golf. I typically wear a half size larger than normal in Nike so I ordered the 8.5 M. There are several color choices but I chose Sunburst/Mango. Yes, they are bright, but they will go beautifully with colors from lime to turquoise so I considered them a neutral. My shoes arrived in a few days (and Free Shipping!)

My old golf shoes weigh about 18 lbs and are thick, ugly white leather. I was shocked to find these new shoes light as a feather. The uppers are mesh which is super breathable. For the best look, a plain white golf sock is suggested. This is the first pair of shoes that I have with NO tongue! Just lace them up (corset-like?).
I found the size to be true to a typical Nike fit. It took a few minutes for me to get used to the light weight, wondering if there was any support at all. Turns out, the support is good. According to Nike, the heel is made of something called Lunarlon. Not sure what that means but it sounds pretty cool. And FEELS great! There is an "integrated traction system". Again, not sure but I didn't slip or fall down at the tee box.

I am a fair weather golfer but should these shoes become damp, I think they would dry quickly and thoroughly. The only potential drawback would be for cool weather golfers, it's possible your feet could get cold in these lightweight shoes.

The suggested retail price is $100. Discounts, mostly in the 20% range, were widely available.

I am so happy that Nike finally got with the program and introduced some better looking golf shoes for women. If they keep this up, I may not wait another 10 years to get more!

My review: A stylish, lightweight shoe for fair weather golfers.

Tuesday, May 28, 2013

When a Tool Box is Better Than a Picnic Basket

We are blessed to live very near a beach and much of our summer is spent there. For years, I have struggled with every sort of picnic basket and large plastic bin for our cookout supplies. We cook out at the beach often and need matches, plastics, foil, silverware, all kinds of stuff. When we store it in a large bin, we have to sift through all the stuff trying to find what we need, and it's almost always at the very bottom.  Inspiration struck at Home Depot when I saw the large tool boxes. I begged to buy one ($15) but my husband assured me he had one he wasn't using. Sure you do ...
Actually, he did. Here's the before:
ick.

So I filled it with everything we need on a regular basis. It all fit beautifully, especially the top tray for the small things that always get lost. But it was still a little tool-y looking. So I got to work with my trusty vinyl cutter and, voila! We have a cook, organized, easy to transport box with our cookout supplies.

I think this will make a fabulous gift as well, very cool and very personal. Yay!

Tuesday, May 21, 2013

Rotisserie Chicken Stock Recipe: Pressure Cooker

If you are looking for a more flavorful chicken stock, something really satisfying, try this:

Note: I am relatively new to the word of pressure cookers. This one time kitchen staple is making something of a resurgence. I'm pretty sure my mom never used one but my grandma did. I did research before purchasing and using mine, an 8 quart stainless steel model. The recipes assume you have pressure cooker experience. If you don't, check this link out: http://missvickie.com/workshop/buying.html
There's a short learning period but the results are so worth the investment.

Pressure cookers use pressure (duh) to cook at very high temperature. Something like a roast will be fork tender in just an hour. Soups, my favorite, are richer and more flavorful than any soup I have made even with hours on the stove. This is my recipe for

Chicken Stock using a rotisserie chicken from the supermarket

1 fully cooked rotisserie chicken
2-3  32 ounce cartons of chicken broth. If you are eating some of the purchased chicken for a meal, use 2 cartons of stock. If the whole chicken is for soup, use 3 cartons.
1 chopped onion
1 T. olive oil
chicken seasonings you desire (I like rosemary and sage)


Saute the onion in olive oil until brown in the pressure cooker pot (not sealed). Take all of the meat from the chicken and put aside. Add the bones and skin to the pot. Don't worry about the fat from the skin, you can skim the stock after cooking. Pour in the broth. Add the seasonings and bring to a boil. Put the lid on the pressure cooker and seal shut. Once the steam is steady, reduce the heat to medium and cook for 30 minutes.
Remove the pressure cooker from the heat and let it cool naturally. The pressure button will release when it is safe to open.


Transfer the cooked stock to another pot, straining through a colander. Don't want bones and skin in the soup! I use the back of a large spoon to press all of the stock from the bone mess. Discard the bone mess.
Chop the chicken meat you removed from the bones and add to the stock.
Refrigerate until cool then skim the fat.
Voila!
You now have the most flavorful base for a variety of soups!

Wednesday, May 15, 2013

Five Fresh Ideas for Flower Clips


Flower clips are one of the most versatile yet inexpensive ways to dress up almost anything. For the DIY Flower Clip, click here.

DIY Silk Flower Clips

Bright, lovely flower clips can be found in most women's accessory departments. Usually featuring a pin back, this pop of color brightens up plain-jane sweaters and jackets. I like to have assorted colors and sizes of blooms at the ready so instead of paying the big bucks, I make my own.

I don't use pin backs (although you could), I prefer clips. Here's what you will need:
Silk or fabric flowers (you can buy them singly or in a bunch at craft stores)
Green felt
Clips  There are a variety of clips available in the jewelry finding department of craft stores. They are very inexpensive.
Hot glue gun
Exacto or craft knife, scissors

Pull the bloom from the stem. There is a plastic-y connector. The keep the flower from coming apart, I use the hot tip of the glue gun to melt the plastic down flat.


Cut a rectangle of felt approx. ¾" x 2" (or whatever size will cover the back). Felt comes in a variety of shades of green. You can also use craft foam sheets, suede or fabric.


Squeeze hot glue across the back of the flower in an area slightly smaller than the felt. The TOP of the clip will be AGAINST the petals. Open the clip and lay the felt across then press onto the hot glue (caution ... HOT!) When the glue cools, the clip will stay in place.


To fancy it up even more, cut away the bulk of the plastic middle and hot glue in a button, bead or jewel.


Tuesday, May 14, 2013

The Kid's Table: Make it THE Place to Sit!

                           
To escape the stigma of the "kid's table," I decided to decorate this scaled-down table and chairs to make it the special place to sit for the little ones.
I started with an unfinished wood, child-sized table and chairs. I bought them at JoAnn's and assembly was required. The good news, the entire set was less than $50.
I decided on a leafy jungle theme. I am somewhat artistic but this design was super easy.

I started with an idea sketched on the table with pencil. The design consisted of varying sizes and shapes of leaves in different shades of green. Acrylic craft paint works fine. I used brown and tan for the monkey (or humkey, as Jack calls it), yellow for the bananas and two shades of red for the flowers. I use paper plates to mix paint. I looked around online for cartoon images as inspiration for the monkey and bananas.

For a design like this, it's best to paint the back, dark color first. The only area I left unpainted was the monkey because I was afraid the dark green would show through the light tan. I painted the table top and chair backs and legs with two coats of dark green acrylic craft paint.

For the leaves, I found some leaf designs on the internet and printed them as large as I wanted.

I used chalk to coat the back of the leaf image then turned it over and traced the leaf. Repeat with various sizes and shapes of leaves. The chalk wipes right off the surface for easy clean-up.

To keep the design simple and graphic, each leaf was a solid color, no shading. Overlapping leaves enhances the design, just be sure the lowest paint level is completely dry before moving on. The uppermost layers were the lightest shades of green. I used small leaves scattered on the chairs.

Next, I painted the shapes for the monkey and the bananas. To define them, I sued a Sharpie market to outline the shapes. I messed up a few times and painted over until I had it how I wanted.

For the chair seats, I sketched a large hibiscus using a photo from the internet. Again, using paper plates for mixing, I used a bright red and shaded with a darker red. I drew the style with a Sharpie then added yellow paint for the pollen sacs. Don't worry, it looks great from a distance even if imperfect up close.

I found that using large scale elements, even on a kid-sized table, gives the coolest look.

Once all painting was complete and thoroughly dry, I applied three coats of water-based sealant. For the finishing touch, I cut a section of raffia grass skirt material and hot glued it to the underside of the table like a table skirt.
I admit, these elements are likely not found together in a jungle, but this table and chairs have become the hot seat when kids come to our house!

Lemon and Pancetta Roasted Chicken

Lemon and Pancetta Roasted Chicken
A savory and flavorful twist on a simple roasted chicken.

You'll need:
1 large roasting chicken (NOT stewing chicken, I learned that the tough way)
Olive oil
1 large lemon
4 oz. chopped pancetta
Poultry seasoning
3 or 4 sprigs of fresh rosemary
White wine, not too sweet (I like Pinot Grigio)
3 T. butter (optional)
2 T. capers (optional)

Large baking dish or roasting pan (I line with foil because I hate clean-up)
string
Oven preheated to 350°
Rinse and pat dry the chicken. Be sure all inside yuck is removed.
Using muscle, roll the lemon around on the counter to "loosen up" the juices. Make several small slices in the lemon by stabbing with a paring knife.
Rub olive oil all over the surface of the chicken, a nice "chicken massage".
Pour some white wine into the cavity of the chicken (and then pour a glass for yourself ...)
Squeeze the lemon over the chicken.
Place the lemon inside the cavity of the chicken along with the sprigs of rosemary.
Sprinkle poultry seasoning over the chicken and rub in.
Loosen the skin from the chicken and stuff pancetta under the skin, in the cavity and in the crevices.


Tie the legs together and tuck the wing tips under the chicken.
Add 1 cup of white wine to the baking dish.
Bake uncovered at 350° for 1½-2 hours or until the temperature reaches 170°.
Add the butter to the pan about 1 hour into cooking.
Spoon the juices over the chicken every half hour or so.

To serve, carefully remove the lemon and rosemary. You can cook the juices down or thicken to make a fabulous sauce. Add capers to the sauce if desired.

Enjoy!

Friday, May 10, 2013

Pound Your Chicken!

In the big "What's for dinner?" picture, chicken appears often. I am a fan of boneless, skinless chicken breasts. No matter which recipe I use, I always Pound My Chicken (using a meat mallet). Here are the top 5 reasons you should always pound your chicken:
1. An even thickness allows for even cooking.
2. Pounding breaks down the fibers in the meat making it more tender.
3. The chicken appears larger, therefore, you feel like you are eating more!
4. Thin chicken cooks more quickly.
5. Feeling a little wound up? Pound it out!

I use a ziplock bag or plastic wrap to keep chicken parts from spraying across the kitchen. If a marinade is in order, pour it right in the ziplock bag.